Setup Internet Router with Network Settings: A Comprehensive Guide
Your router is the backbone of your home network, and configuring it properly is essential to ensure a seamless online experience. In this article, we'll take you through the step-by-step process of setting up your internet router with network settings, from connecting cables to configuring advanced options.
Why Configure Your Router's Network Settings?
There are many reasons you might need to access your router's settings, from changing the Wi-Fi network name (SSID) or password to updating admin credentials to adjusting channels for better performance. With the increasing importance of home networks, router interfaces have become more user-friendly, and many major brands offer mobile apps for easier management.
Step 1: Connect Your Router to the Modem and Power Source
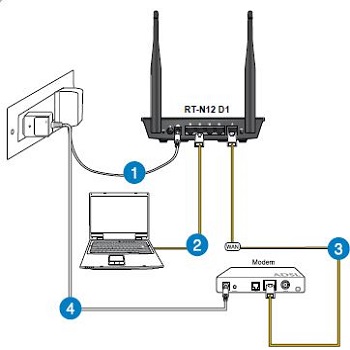
The first step in setting up your router is to connect it to the modem and power source. Make sure the modem is turned on and the power cord is securely plugged into the router. Next, connect the router to the modem using an Ethernet cable. This will establish a connection between the modem and the router, allowing you to configure the network settings.
Step 2: Access the Router's Web Interface
Once the router is connected to the modem, open a web browser and type the router's IP address in the address bar. The default IP address for most routers is 192.168.1.1. This will take you to the router's web interface, where you can access and configure the network settings.

 - LazyAdmin")
 - HP")


![[Wireless Router] How do I enter my ASUS router's setting page using ...](https://robots.net/wp-content/uploads/2023/09/how-setup-dlink-wireless-router-1696072588.jpg "[Wireless Router] How do I enter my ASUS router's setting page using ...")


